Remember my popped tops Will in my SED blog...
They looked good on the Engine bay side, but the drivers one had virtually popped..
as Ive said, its the under wing view thats the ALL important decider!
1998 XM - 2.1td - Steamy Windows!
-
citroenxm
- Global Moderator
- Posts: 9987
- Joined: Wed Apr 15, 2009 9:11 am
- Location: North Wales - FAR far far away!!! :-p
Re: 1998 XM - 2.1 VSX Manual
Projects:(eventually if theres any bodywork left)
93 L Xm 2.1t D auto project
93 L xm V6 12v Sei Manual
Others
In use.. 1995 M reg S2 2.1td auto exclusive
93 L Xm 2.1t D auto project
93 L xm V6 12v Sei Manual
Others
In use.. 1995 M reg S2 2.1td auto exclusive
-
Dieselman
- Global Moderator
- Posts: 15100
- Joined: Thu Jun 18, 2009 6:44 pm
Re: 1998 XM - 2.1 VSX Manual
I was looking at the surface rust on the baseplate, but then yours looked good in that area, also...
91 3.0 sei M. 4852 EXY Black
92 2.1 sed M. 5740 ECZ Sable Phenicien
92 3.0 V6-24. 5713 EXY Black
92 2.1 sd M. 5685 ENT Blue Sideral
Prev
90 2.1sd M. 5049 EJV Mandarin
92 2.1sd A. 5698 EJV Mandarin
94 2.1sd A. 6218 ERT Triton
91 2.0si M. 5187 EWT White
92 2.1 sed M. 5740 ECZ Sable Phenicien
92 3.0 V6-24. 5713 EXY Black
92 2.1 sd M. 5685 ENT Blue Sideral
Prev
90 2.1sd M. 5049 EJV Mandarin
92 2.1sd A. 5698 EJV Mandarin
94 2.1sd A. 6218 ERT Triton
91 2.0si M. 5187 EWT White
-
turbo_imp
- Knows how to use the parking brake
- Posts: 120
- Joined: Sun Oct 21, 2012 8:58 am
Re: 1998 XM - 2.1 VSX Manual
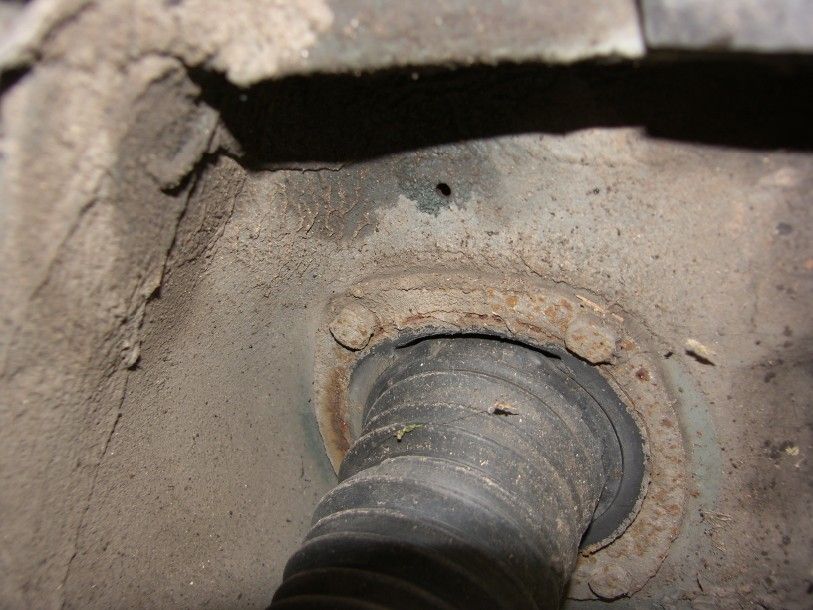
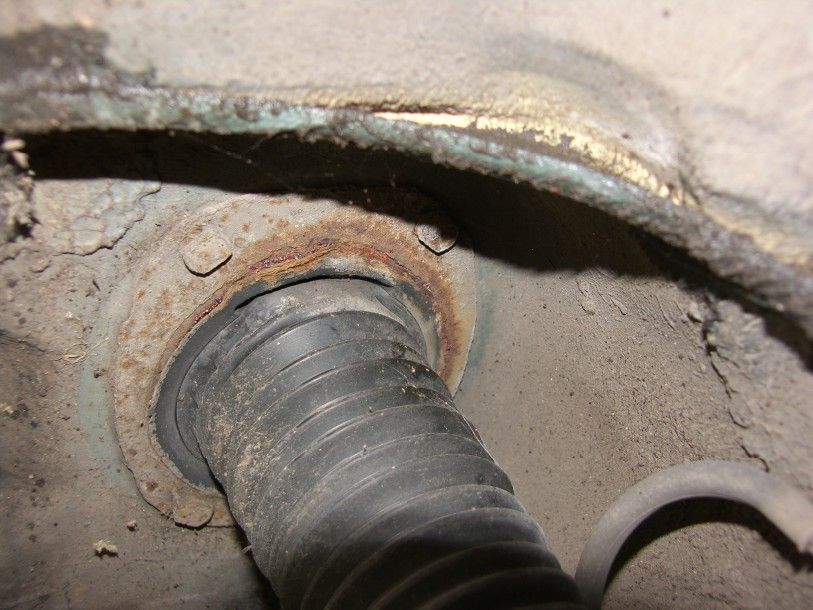
Right here are the under arch pics, drivers side -
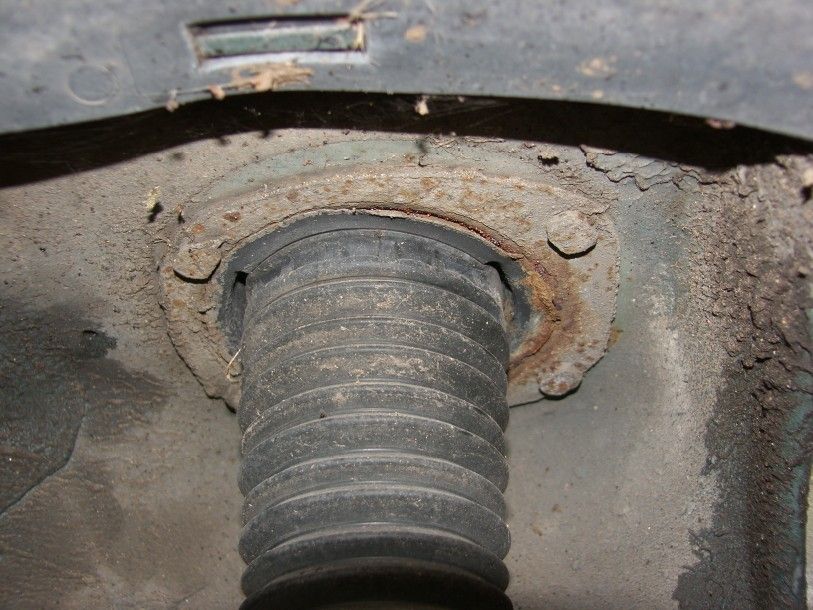
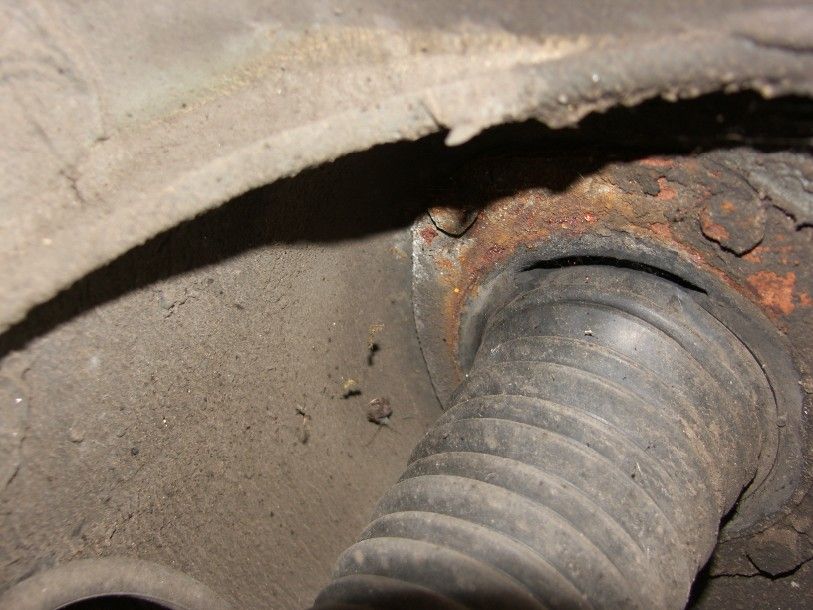
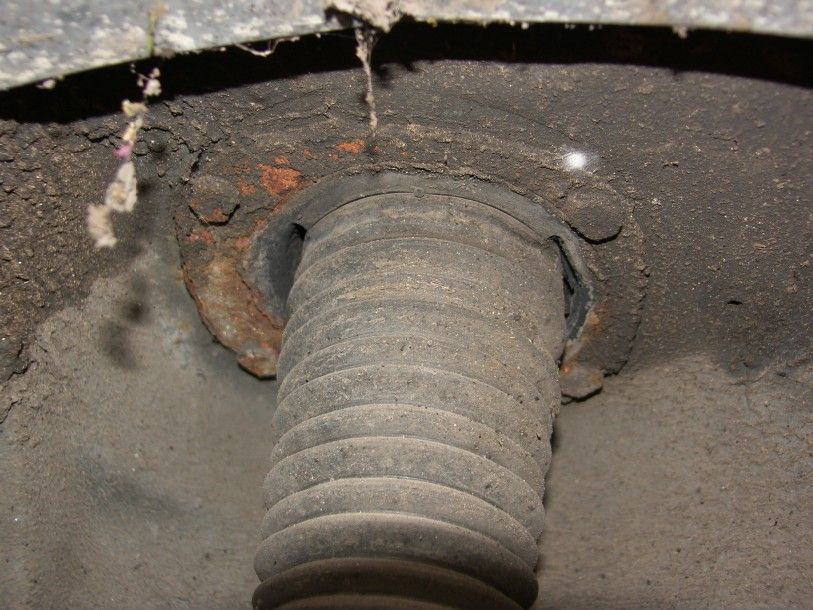
And passenger side -
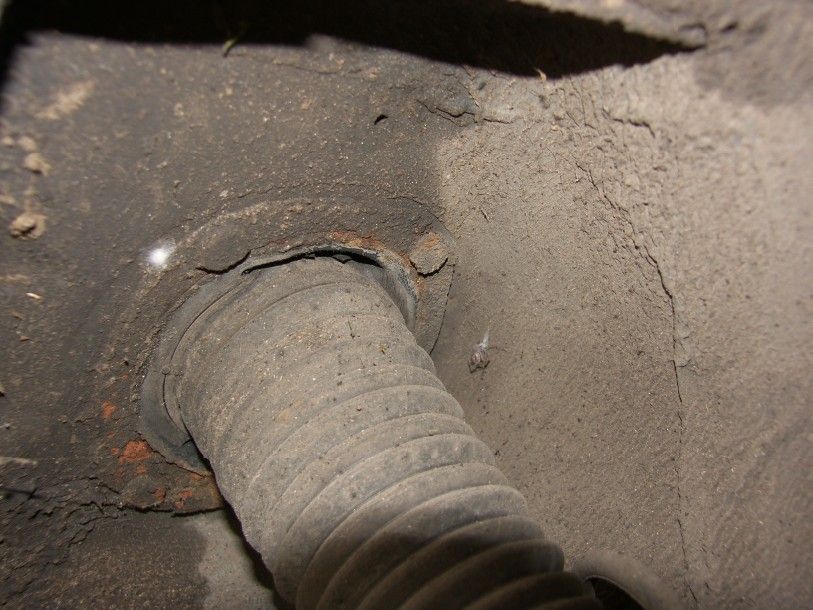
 whats the verdict? I think that the drivers side looks like the bonding is starting to part company with the steel?
And passenger side -
-
robert_e_smart
- Global Moderator
- Posts: 4546
- Joined: Thu Apr 16, 2009 1:08 pm
Re: 1998 XM - 2.1td - More Strut Top Pics!
They aren't bad. I have seen much much worse.
1990 XM 2.1 Turbo SD
2008 Volvo V70 D5 SE Lux Automatic
2009 Volvo XC90 D5 SE Automatic
2008 Volvo V70 D5 SE Lux Automatic
2009 Volvo XC90 D5 SE Automatic
-
xmexclusive
- Global Moderator
- Posts: 5931
- Joined: Wed Apr 15, 2009 8:11 am
Re: 1998 XM - 2.1td - More Strut Top Pics!
There is no sign of Axial Tearing on either strut head. (A)
There is no sign of significant metal loss from baseplate underside rusting. (B)
On both there is evidence of the first stages of debonding between the top of the rubber cone and the baseplate cone. (C)
There is some evidence of top rubber peel. (D)
Examination for significant metal loss from top side metal rusting (E) needs a bit of manual intervention rather than a photo.
Seperation of the inner cone. (F) No check but not likely.
Quick guide to the modes of failure and my assessment of their implications.
I will take them in order of seriousness.
(F) - Separation of the inner cone.
The metal centre of the strut head is made of two parts crimped together.
Head has to be removed to check and failure is dramatically sudden.
These failures were common in a few very early cars from 1989 to 1992.
The basic strut head design was changed by 1990 to eliminate the risk.
Very little chance any of these strut heads survive in service.
Method of checking - examine the inside of the strut head near the top -
you will see some dimples in the steel - these lock the two halves of the head together.
If there are 10 dimples forget this risk.
If there are only 4 dimples physically scrap the strut head with Mr Angry Grinder so no one can reuse it.
(A) - Axial tearing.
On the Citroen strut head design the centre hole of the baseplate is slightly larger than the base diameter of the metal centre.
Only the rubber of the cone prevents strut head pop-up.
When the rubber of the cone is subject to repeated loads well outside the design range it will start to tear on the underside.
The tear will start as opposing halves of a circle and will eventually form a ring.
The tear will also progress virtically up through the rubber.
The Axial cylinder so formed goes through that rubber only gap mentioned above.
Final failure is sudden with no warning.
No rusting needed for this one.
Protect against by reasonably frequent underside examination and avoid running with flat spheres.
The examination is made more difficult by the two design indents in the rubber, the not always perfect finish of the rubber and
the circular wear mark caused by the top of strut rubber gaiter.
Best to replace with strut heads protected by design against pop-up.
Do not believe the old wives tale that the Citroen later design is pop-up protected if you value your bonnet.
See the photo of Minijet's failed strut head that XMX has kindly posted below.
Perfect example of Axial tearing. No sign of any rust or top rubber degradation.
My estimate is that the underside cracks would have been spottable for at least a year.
(B) - Underside Rusting
The baseplate metal rusts away from the underside.
The worst affected area is usually on the bend where the cone is formed.
When made by stamping the metal grain structure here is streatched and the bonds opened up.
This makes it much easier for agressive rusting to get started and rapidly become very serious.
Fortunately on the XM Citroen left this high risk metal area exposed to the windy wheel arch.
The metal dries rapidly usually before any rusting can start.
Not so the Xantia where they sealed the baseplate with poorly bonded rubber.
As the bond fails the rubber flap sucks in by capilliary action water (often salt water) and air and holds it against the quickly rusty steel.
So low risk on an XM, easy to examine for visually and if necessay probe with a screwdriver.
Pity the poor Xantia owner as the screwdriver usually goes right through, handle and all.
(E) - Topside Rusting
The baseplate metal rusts away from the top.
On an XM strut head this is usually an advance stage of top rubber peel.
The two high risk areas are the inner edge of the baseplate centre hole and the bend to form the cone.
If significant rusting increases the actual size of the baseplate centre hole then it makes Axial Tearing failure much easier
and more likely to happen.
Examining the steel making up this hole is difficult because of the cover on the head centre and the presence of the top
rubber on the baseplate.
Poking about here with a screwdriver is not a good idea.
You are more likely to start axial tearing than find rust holes.
Visual condition of top rubber bond is quite a good guide.
If the top ring of rubber is firm, it normally is, then there is no problem.
With the bend to form the cone fortunately Citroen stopped the top rubber just before the bend.
The bend does trap water but that water is exposed to the atmosphere and dries quickly.
There is usually some surface rust formed here but I have never seen any serious problems on XM's.
Probably helped by the steel crystaline structure being tightened on the inside of the bend making rust penetration more difficult.
(D) - Top Rubber Peel
The top rubber of most XM strut heads will eventually bubble and peel in places.
It usually starts from the bottom edge of the rubber.
When peeled you find platelets of rusty steel still bonded to the inside of the rubber.
I believe that this is caused by poor specification or quality control in the baseplate pressing.
The rusty steel platelets are typical of a steelmaking defect called "Mill Scale".
Mill Scale is caused by a build up of dirt and impurities on the mould forming faces of the press.
It is logical that the top raised face of the baseplate gets the worst of the mill scale.
Mill scale is effectively a minuture rust cell pressed into the face of the steel.
It will eventually destroy any surface finish applied to the steel.
Thin bonded rubber finish in this case, presents no barrier, the rust cell under it expands over time and bubbles the rubber up.
At the edges and when the rubber cracks the flap stays there but now water and air can be drawn in by crapilliary action.
If left rusting starts in ernest.
Rate and extent of this problem depends entirely how much crap the pressing process puts into the steel baseplate surface.
I personally strip this surface rubber at first sign of bubbling.
Check the underlying steel for deep rusting (unusual).
Then clean and Hammerite the steel.
(C) - Top of Rubber Cone Debonding
The above checks have made sure that the metal baseplate cone is not rusted away.
So the rubber cone debonding from the underside of the metal baseplate cone will not in itself risk bonnet pop-up.
There is still full vertical support even when debonding is total.
Car in this state is a MOT failure due to a loose suspension component.
Jacking with the wheel hanging shows the fault.
Gluing with a structural adhesive may effect a short term repair.
The refurbished strut head photos added below by XMX show well the bottom anti-pop-up ring that Kingas welds on.
It is a steel ring rolled from 4 or 5mm wire welded on the outside bottom of the steelcentre tube.
A similar ring is also welded to the underside of the baseplate centre hole.
These rings are of a similar diameter so cannot pass but at worst will lock together if the strut head rubber fails.
I am considering asking for the bottom ring position to be moved up a bit on my next batch of refurbs.
John
-
turbo_imp
- Knows how to use the parking brake
- Posts: 120
- Joined: Sun Oct 21, 2012 8:58 am
Re: 1998 XM - 2.1td - More Strut Top Pics!
Wow thanks John! Comprehensive! I will digest this over the evening and come back with some more information
As for the cambelt, anyone else struggle with the tensioner? I cannot get the bloody thing apart! Looks like I need a stud extractor? Or does the tensioner come apart to reveal the stud?
Thanks for the help guys!
J
As for the cambelt, anyone else struggle with the tensioner? I cannot get the bloody thing apart! Looks like I need a stud extractor? Or does the tensioner come apart to reveal the stud?
J
-
XMX
- Could do a 2.1 headgasket
- Posts: 1171
- Joined: Tue Oct 20, 2009 11:08 am
Re: 1998 XM - 2.1 VSX Manual
Hi Russ,russ92xmsed wrote:That would be interesting Paul to see your old SED ones. Do you have any pics of the Kingas tops you have fitted too?
Just to reiterate what Paul has mentioned about the rubber on top of the tops, one of mine has badly peeling rubber, I did just simply remove it all and under seal it.
At this rate we will all be photographing our tops from underneath and rating them out of 10!!!
There was recent a THREAD which showed Photo's of some of the KINGas re-furbed strut tops and I also posted other links to get to other Strut Top threads etc. !
I see that you'd made some initial posts in the thread linked /\ , but perhaps you'd not read some of the final posts possibly ?
Heres the Photos of the final production refurbed Strut top in 'Black Polyurethane Rubber' from KINGas
So back to this thread, which Johns comprehensive write up explains what to look for !
However, lets not forget Paul's (Minijet) XM which had a fairly reasonable looking Strut-Top, (relative to condition of the rubber and baseplate) looking from the top-side but it still made an escape and 'Speared' the O/S of the bonnet on his XM whilst it was stationary/parked up :-
Note ! Click on Photo to open that thread !
XMX
.
Last edited by XMX on Fri Feb 15, 2013 6:10 pm, edited 1 time in total.
An XM if for life, (Not just for Christmas) !
-
kenhall
- Citroen go-to-guy
- Posts: 849
- Joined: Sat Apr 18, 2009 6:53 am
- Location: West Cumbria
Re: 1998 XM - 2.1td - More Strut Top Pics!
2.1TD cambelt tensioners are a bit of a pain in my experience and the Citroen w/s manual instructions are misleading. It doesn't help that the tensioner is largely hidden from view by the alloy engine support plate. Removal of this plate, with the engine supported, is necessary if tensioner renewal is planned.turbo_imp wrote:
As for the cambelt, anyone else struggle with the tensioner? I cannot get the bloody thing apart! Looks like I need a stud extractor? Or does the tensioner come apart to reveal the stud?
J
The tensioner is supplied as a complete assembly consisting of the roller, spring , sliding mounting plates and a lockable snail cam to release the belt tension.
Cambelt renewal following removal of the crankshaft sprocket and locking the flywheel, cam and injection sprockets is briefly as follows:
To release the belt tension first slacken off the nut in the middle of the roller.
Using a 5mm allen key slacken off the bolt (via the hole in the alloy plate) which releases the snail cam. Using a 10mm socket the snail cam can be rotated fully clockwise against the spring tension which moves the roller away from the cambelt. Tighten the allen bolt to hold the tensioner in this position and fit the new cam belt.
Remove all locking pegs and turn the snail cam fully anti-clockwise which allows the tensioner spring to act on the roller thus tensioning the belt.
Carry out two forward turns of the crankshaft and stop at the point where it would be possible to insert the locking pegs.
Tighten the nut in the middle of the tensioner roller plus the allen bolt to lock the snail cam.
In my experience re-adjusting the tension after a few thousand miles is well worthwhile because a new belt will bed in and the teeth become polished which causes a significant reduction in tension resulting in a floppy belt!
Ken
-
russ92xmsed

- Global Moderator
- Posts: 5733
- Joined: Mon Jun 11, 2012 5:23 pm
- Location: Cheltenham
- Contact:
Re: 1998 XM - 2.1 VSX Manual
XMX wrote:Hi Russ,russ92xmsed wrote:That would be interesting Paul to see your old SED ones. Do you have any pics of the Kingas tops you have fitted too?
Just to reiterate what Paul has mentioned about the rubber on top of the tops, one of mine has badly peeling rubber, I did just simply remove it all and under seal it.
At this rate we will all be photographing our tops from underneath and rating them out of 10!!!
There was recent a THREAD which showed Photo's of some of the KINGas re-furbed strut tops and I also posted other links to get to other Strut Top threads etc. !
I see that you'd made some initial posts in the thread linked /\ , but perhaps you'd not read some of the final posts possibly ?
So back to this thread, which Johns comprehensive write up explains what to look for !
However, lets not forget Paul's (Minijet) XM which had a fairly reasonable looking Strut-Top, (relative to condition of the rubber and baseplate) looking from the top-side but it still made an escape and 'Speared' the O/S of the bonnet on his XM whilst it was stationary/parked up :-
Note ! Click on Photo to open that thread !

XMX
.
Hi,
Yes I remember your thread about the new tops. I was after a pic of one fitted to the car really...and knowing Paul was one of the early adopters of them.... Just wanted to see what they are like really. Wasn't there concern about that top you had done, being the right one. As it does look significantly different.
Excellent description John of failures.
Russ
1992 K reg XM 2.1 Auto SED RP 5712
1992 K reg XM 2.1 Auto SED RP 5705 (D)
Also
2003 C5 2.2 HDI Exclusive
I sell Engine bay, 1990 COTY, Total & Club XM Sticker Decals
http://www.rjwcreativedesign.co.uk
1992 K reg XM 2.1 Auto SED RP 5712
1992 K reg XM 2.1 Auto SED RP 5705 (D)
Also
2003 C5 2.2 HDI Exclusive
I sell Engine bay, 1990 COTY, Total & Club XM Sticker Decals
http://www.rjwcreativedesign.co.uk
-
citroenxm
- Global Moderator
- Posts: 9987
- Joined: Wed Apr 15, 2009 9:11 am
- Location: North Wales - FAR far far away!!! :-p
Re: 1998 XM - 2.1td - More Strut Top Pics!
Thats how my SED top looked, perfectly fine on the cone, but as in my SED blog, ready to tear away!
I was lucky..
My recent SD 2.1 tops look simmilar to those Imp has posted.. Im not desperatley worried about mie yet.. They have some life left.
I was lucky..
My recent SD 2.1 tops look simmilar to those Imp has posted.. Im not desperatley worried about mie yet.. They have some life left.
Projects:(eventually if theres any bodywork left)
93 L Xm 2.1t D auto project
93 L xm V6 12v Sei Manual
Others
In use.. 1995 M reg S2 2.1td auto exclusive
93 L Xm 2.1t D auto project
93 L xm V6 12v Sei Manual
Others
In use.. 1995 M reg S2 2.1td auto exclusive