Drive Work
Posted: Thu Jan 19, 2012 11:53 am
Hi all,
No real work has been done on the XM since getting it back on the road in the spring, all of the rest of the year was taken up with sorting out the existing driveway and turning the garden into a hard standing.
It took so long to do because I was mainly working on my own and saving as much of the exisiting driveway as possible to use as hardcore for the new drive. All this entailed barrowing large amount of rubble into the back garden to be stored until the soil was dug out to give the finished level required. All the digging was done the old fashioned (cheapest!) way and 60 tons of waste barrowed into skips. Slow but good exercise. The quotes we had were well outside our budget so it was all done with price the governing factor.
The first steps to see how the existing drive was made up. Not easy to see but the finished level of the existing drive was above the damp proof course.

The blue pipe contains the armoured power feed to the garage. I wanted to widen the gap between the gate posts to give me a couple of extra inches, the XM is a very tight squeeze.

The gatepost was dug up and cleaned off.
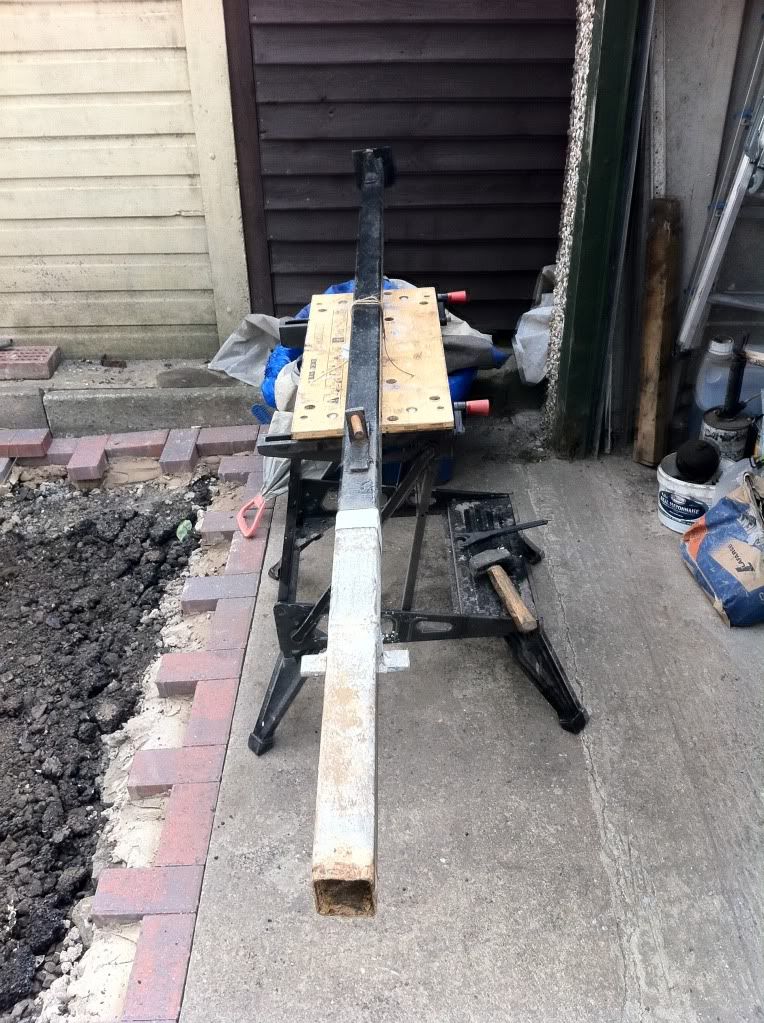
I decided that a bit of extra metalwork would help support the gates, this seemed needed because I couldn't digout on the far side of the gatepost because it was on the boundary and under their garage. The whole lot was seam welded, painted, waxoyled internally and the openings plugged with silicone sealant.
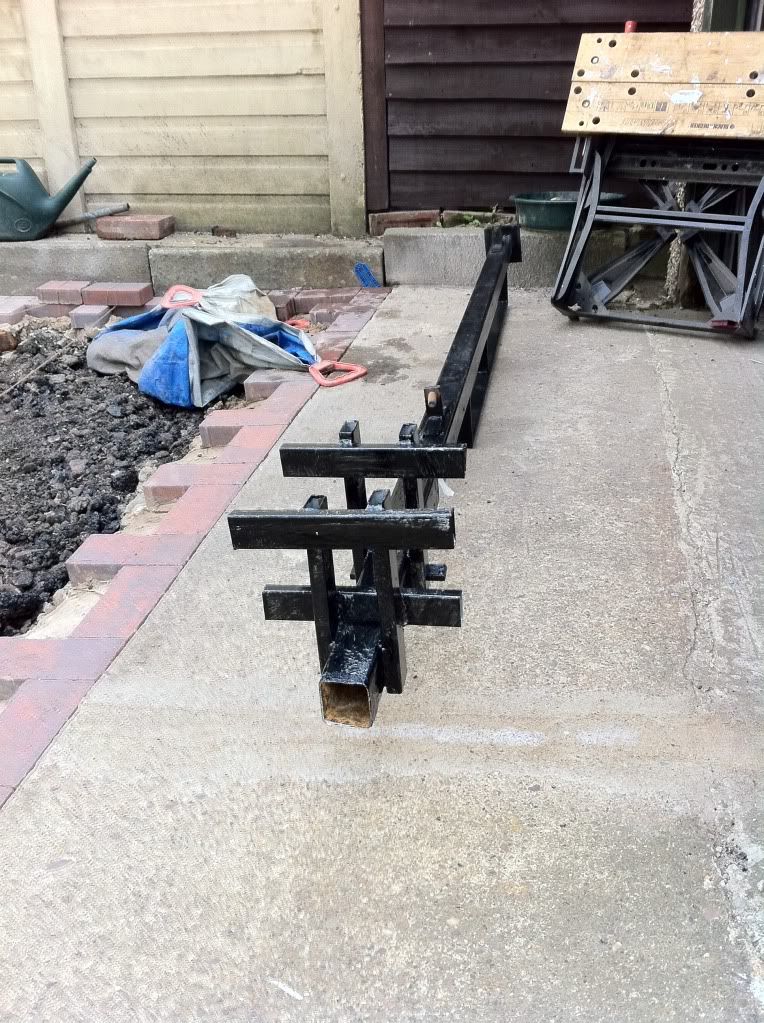
Now in place. The other side of the gate had an extra wooden post fastened to the wall to allow the gates to meet. This was removed too to give another 3 inches of clearance. Metal brackets were later welded to the gates so that the chain wouldn't be needed to lock them shut.

The drive was done in sections to cut down on the amount of barrowing needed to move the hardcore around. There was some kind of problem with the Concrete, it dried before we had time to finish it but at least it's level and smooth. The bricks in this little corner have been sandblasted to clean off any splashes and accumulated dirt, the difference between cleaned and uncleaned can be seen further along the wall. After sandblasting, the bricks had two coats of Thompsons Waterseal. The pipe work still needs finishing in this shot.

It used 3 cubic metres of concrete to do this first section.

Second section ready to go.

A short delivery made a mess of things. Definately short but you can't prove it? Although the concrete looks thin in this shot it is a minimum of 4 inches thick everywere.
A decision was made to replace the old fence. I wanted a fence high enough to give me some privacy whilst 'on the front'. The uprights are about 8'6" which makes handling them tricky due to their weight. I needed help to slot the panels into place, the uprights and gravel boards went into place before the panels were ordered. The cable strung across is the Cable media service, I want it accessible so that if it goes faulty and new piece can just be pulled in. Eventually I'll tube it to give it some protection.

Next job was to divide up the large area to make pouring and tamping the concrete more manageable. All the spare blocks were used as infill. Quite a few trips were made with the XM scrounging bricks and hardcore out of builders skips. Luckily I didn't have to buy any hardcore at all. All areas have a 5 to 6 inch hardcore base.

So here's how it used to look. Note the scabby fence, weed membrane showing through the gravel and the exisiting mismatched tarmac drive concrete path. Behind the Prius are 2 Parabags of builders sand and 2 packs of blocks, these too had to be moved around the back by hand. Things like this really lenghtened the job.

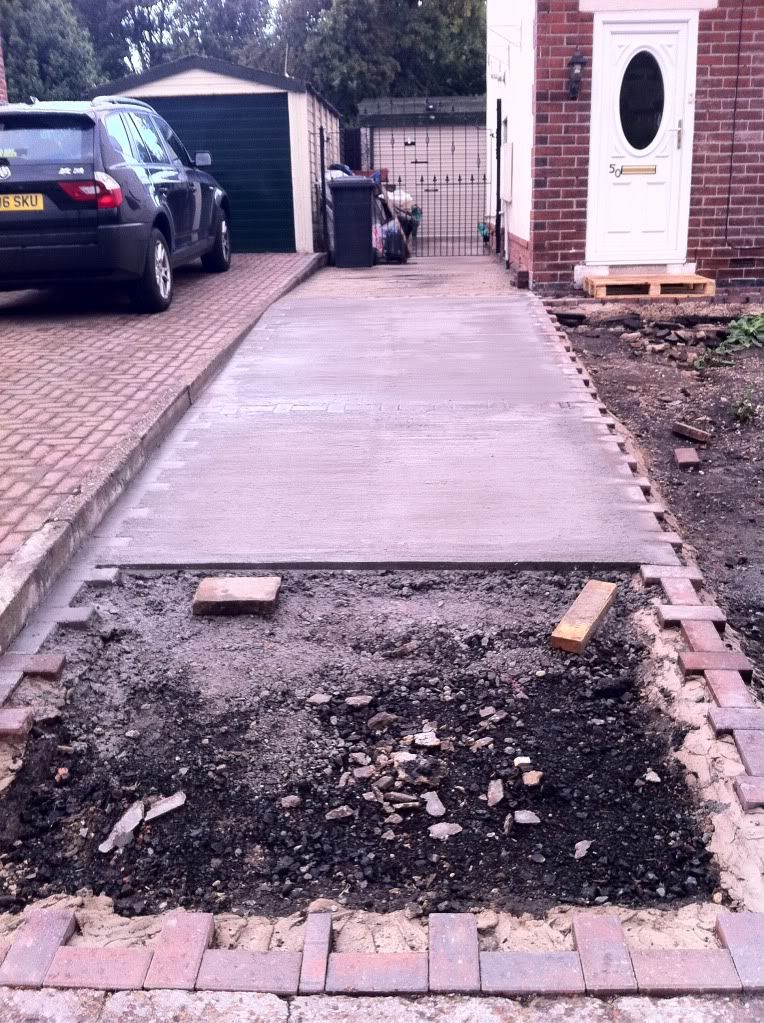
There's still more work to do but it's useable. The blocks need cleaning off, the bay repointing and the brickwork sandblasting and a couple of coats of sealer. Roll on Springtime!

Steve.
No real work has been done on the XM since getting it back on the road in the spring, all of the rest of the year was taken up with sorting out the existing driveway and turning the garden into a hard standing.
It took so long to do because I was mainly working on my own and saving as much of the exisiting driveway as possible to use as hardcore for the new drive. All this entailed barrowing large amount of rubble into the back garden to be stored until the soil was dug out to give the finished level required. All the digging was done the old fashioned (cheapest!) way and 60 tons of waste barrowed into skips. Slow but good exercise. The quotes we had were well outside our budget so it was all done with price the governing factor.
The first steps to see how the existing drive was made up. Not easy to see but the finished level of the existing drive was above the damp proof course.
The blue pipe contains the armoured power feed to the garage. I wanted to widen the gap between the gate posts to give me a couple of extra inches, the XM is a very tight squeeze.
The gatepost was dug up and cleaned off.
I decided that a bit of extra metalwork would help support the gates, this seemed needed because I couldn't digout on the far side of the gatepost because it was on the boundary and under their garage. The whole lot was seam welded, painted, waxoyled internally and the openings plugged with silicone sealant.
Now in place. The other side of the gate had an extra wooden post fastened to the wall to allow the gates to meet. This was removed too to give another 3 inches of clearance. Metal brackets were later welded to the gates so that the chain wouldn't be needed to lock them shut.
The drive was done in sections to cut down on the amount of barrowing needed to move the hardcore around. There was some kind of problem with the Concrete, it dried before we had time to finish it but at least it's level and smooth. The bricks in this little corner have been sandblasted to clean off any splashes and accumulated dirt, the difference between cleaned and uncleaned can be seen further along the wall. After sandblasting, the bricks had two coats of Thompsons Waterseal. The pipe work still needs finishing in this shot.
It used 3 cubic metres of concrete to do this first section.
Second section ready to go.
A short delivery made a mess of things. Definately short but you can't prove it? Although the concrete looks thin in this shot it is a minimum of 4 inches thick everywere.
A decision was made to replace the old fence. I wanted a fence high enough to give me some privacy whilst 'on the front'. The uprights are about 8'6" which makes handling them tricky due to their weight. I needed help to slot the panels into place, the uprights and gravel boards went into place before the panels were ordered. The cable strung across is the Cable media service, I want it accessible so that if it goes faulty and new piece can just be pulled in. Eventually I'll tube it to give it some protection.
Next job was to divide up the large area to make pouring and tamping the concrete more manageable. All the spare blocks were used as infill. Quite a few trips were made with the XM scrounging bricks and hardcore out of builders skips. Luckily I didn't have to buy any hardcore at all. All areas have a 5 to 6 inch hardcore base.
So here's how it used to look. Note the scabby fence, weed membrane showing through the gravel and the exisiting mismatched tarmac drive concrete path. Behind the Prius are 2 Parabags of builders sand and 2 packs of blocks, these too had to be moved around the back by hand. Things like this really lenghtened the job.
There's still more work to do but it's useable. The blocks need cleaning off, the bay repointing and the brickwork sandblasting and a couple of coats of sealer. Roll on Springtime!
Steve.